
…they drew their plans against us!
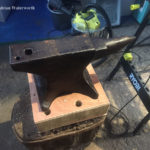
No, Drummore has not been invaded by Martians! It is, however, inching closer to having a working smithy in the village once more. Thanks to Glenda, the old Drummore Smiddy now contains an anvil again. It’s a bit of a baby one (only weighs just over a hundredweight – or around 57kg in new money) and it’s getting on a bit in years, with a few dings here and there, but it’s solid enough and more than serviceable for my trainee blacksmithing purposes.
I’ve actually had it for a few weeks now, but as you can see above, it needed a good clean up and a good going-over with rust remover/sealer first so that took a little while (in between doing all my other usual day-to-day things). It’s also considerably smaller than the original anvil that was here, so the existing stand (or, rather, stump – a fine old beast of a thing) was going to need building up in order to get the new anvil to around the right working height for me. Again, this has taken a little while, but I was fortunate that I had various offcuts of kitchen worktop and plywood lying around from when we had the new kitchen fitted last year. So, following a week or two of measuring and pondering, I came up with a plan to give the old anvil stump a bit of additional height.
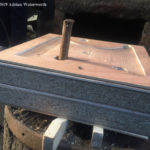
Using the hefty old spikes on the top of the stump as registration/anchor points, I created a thick sandwich of plywood and worktop sections. A final piece of plywood on the top – cut to match the rough shape of the base of the new anvil – provides some lateral stability, along with a short section of metal tube in the centre that will slot into a metal hole on the base of the anvil itself. Et voila!
-
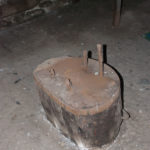
- Anvil goes here
-
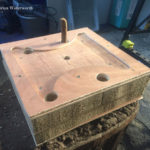
- First, build up your platform
-
- The plywood and worktop sandwich
-

- Tailor made for the new anvil
-
- With a little extra something for stability
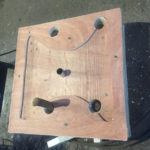
Leaving aside the temporary softwood wedges that I used to level up the whole arrangement (and which will be getting replaced with something better in due course) I think the whole thing worked rather well. And the newly cleaned and rust-treated anvil fits beautifully, even if I say so myself.
-
- A perfect fit
-
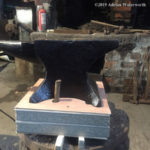
- Pretty level too (well, almost)
-
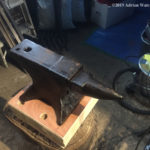
- Almost ready
The one remaining job on this is to anchor the anvil in place. The little cut-out recess that it sits inside and the metal insert in the centre will help to stop it sliding sideways, but there still needs to be something to stop it jumping a bit if I need to do any seriously heavy hammering. One option would be to create staples over the corners using coach bolts and bits of steel, but another option that is often used is to chain it down. I’ve already bought a length of suitable anchor chain (as used on small boats – not supertankers!) and will be wrapping that around the waist of the anvil and attaching it to hooks and adjustable shackles that I will drill into the sides of the stump. This will not only hold the anvil in place, but can also help mute its ring a little since, while most of this anvil isn’t too noisy, striking anything on the bick (a.k.a. the horn or, if you prefer, the pointy bit at one end) does tend to emit a surprisingly ear-piercing “Ting!” at the moment.
And once that’s done, I’ll be firing up the forge! But that’s a story for another day…
0 Comments